應該有朋友見過類似以下的畫面或是 FB:波塞頓之戟 檔案中的索引標籤。
這些「Ribbon功能區」是如何做到的,接下來筆者將一一說明給大家知道如何製作這樣的功能。
從Office 2007之後,微軟導入了「Ribbon圖形用戶介面」取代傳統選單與工具列介面,至於什麼是Ribbon呢?這裡就不多介紹,請自行請教Google大神,它可以幫您解答疑惑,我們只就如何在Office中自訂索引標籤來說明。
接下來我們就來介紹,如何做出以下的「Ribbon功能區」。
Step 1. 下載安裝 Custom UI Editor For Microsoft Office,目前只有到Office 2007與Office 2010。
安裝Custom UI Editor For Microsoft Office後的路徑。
Windows 32-bit
C:\Program Files\CustomUIEditor\CustomUIEditor.exe
Windows 64-bit
C:\Program Files (x86)\CustomUIEditor\CustomUIEditor.exe
Step 3. 透過安裝好的 Custom UI Editor For Microsoft Office,開啟CustomTab.xlsm。
Step 4. 對CustomTab.xlsm,按右鍵,選擇 「Office 2010 Custom UI Part」。
Office 2007 Custom UI Part與Office 2010 Custom UI Part差異:
Office 2007 Custom UI Part 檔名:customUI.xml
customUI屬性
<customUI xmlns="http://schemas.microsoft.com/office/2006/01/customui">
Office 2010 Custom UI Part 檔名:customUI14.xml
customUI屬性
<customUI xmlns="http://schemas.microsoft.com/office/2009/07/customui">
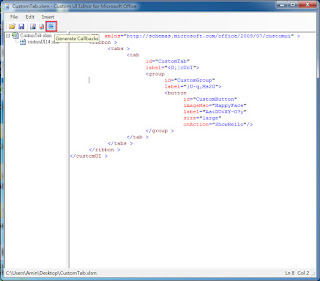
Step 5. 點選CustomTab.xml,輸入以下xml內容,再點選Validate按鈕,確認Custom UI XML格是正確,最後存檔。
<customUI  xmlns="http://schemas.microsoft.com/office/2009/07/customui" >
 <ribbon >
  <tabs >
   <tab
    id="CustomTab"
    label="Custom Tab">
    <group
     id="CustomGroup"
     label="Custom Group">
     <button
      id="CustomButton"
      imageMso="HappyFace"
      label="Custom Button"
      size="large"
      onAction="ShowHello"/>
    </group >
   </tab >
  </tabs >
 </ribbon >
</customUI >
最後就會見到我們自訂「Ribbon功能區」。
Step 6. 點選 「Generate Callbacks」 按紐來確認巨集函數。
Step 7. 接著開始編寫VBA程式碼。
'Callback for CustomButton onAction
Public Sub ShowHello(control As IRibbonControl)
    MsgBox "Hello, 大家好!"
End Sub
按下按鈕,就可以看到自訂「Ribbon功能區」的執行結果。接下來我們希望自訂「Ribbon功能區」以中文方式顯示而非英文顯示,那該如何修改?
Step 1. 將CustomTab.xlsm修改附檔名為.zip
Step 2. 點兩下開啟CustomTab.zip。
Step 3. 進入「customUI」資料夾,將customUI14.xml拖曳出來,用筆記本修改,將屬性label的內容。
<customUI  xmlns="http://schemas.microsoft.com/office/2009/07/customui" >
 <ribbon >
  <tabs >
   <tab
    id="CustomTab"
    label="打招呼">
    <group
     id="CustomGroup"
     label="自訂群組">
     <button
      id="CustomButton"
      imageMso="HappyFace"
      label="顯示問候語"
      size="large"
      onAction="ShowHello"/>
    </group >
   </tab >
  </tabs >
 </ribbon >
</customUI >
Step 4. 另存新檔,這裡要注意在編碼的地方,要設為「Unicode」,將檔案直接覆蓋。
Step 5. 將檔案customUI14.xml,拖曳回CustomTab.zip壓所檔中「customUI」資料夾裡,直接覆蓋原始的customUI14.xml,最後將CustomTab.zip改回原本的CustomTab.xlsm即可。
最後看到的自訂「Ribbon功能區」就會顯示中文。
後面筆者將會再介紹更進階的「Ribbon功能區」做法,如果看不懂的趕快問。
參考資料來源:
- 利用Custom UI Editor自訂Office 2007中文功能區(Ribbon)
- [Office開發系列] Office Ribbon 開發初體驗
- Creating an Excel Workbook with Ribbon


